
Suppose that you would like to insert a label that displays the area of an enclosed figure. While the AREA command can show you the area, it doesn’t create a label in your drawing. If you insert the area at the end of a leader, that area doesn’t change if your object changes in size.
You can use fields (introduced in AutoCAD 2006) to display information about objects. In this tutorial, you create a leader that displays the area of a tub. You can do this in model space or paper space.
- Set up a text style for your leader text and a dimension style for the leader.
- Start the MLEADER or QLEADER command.
- Specify the first leader points and subsequent points until you see a text cursor.
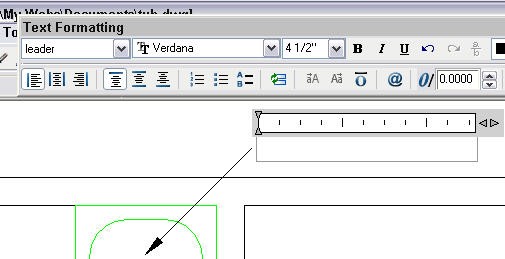
- If you’re using the QLEADER command, At the Specify text width <0″>: prompt, specify the endpoint of the text, leaving enough room for the expected text. At the Enter first line of annotation text <Mtext>: prompt, press Enter to open the Multiline Text Editor, as shown here.
Tips from our reader: To get rid of the text box gray hatch, use Tools -> Options -> User Preferences and uncheck “Display background of fields” under “Fields”
- For either command, when you see the text cursor, type Area: and a space.
- Right-click in the text area and choose Insert Field.
- In the Field dialog box, choose Objects from the Field Category drop-down list. This makes the field you want easier to find.
- Choose Object in the Field Names box.
- In the Object Type area, click the Select Objects button.
- You return to your drawing, where you should select the object. The Field dialog box comes back and it should look like the one you see here.
Note: If your enclosed area isn’t one object, you may be able to use the BOUNDARY command to create a polyline. That’s what I did with the tub.
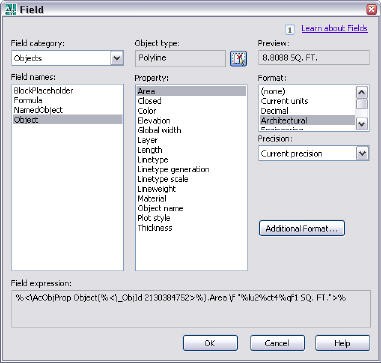
- Choose the property you want to display. I chose Area.
- Choose a format; I chose Architectural.
- Click OK.
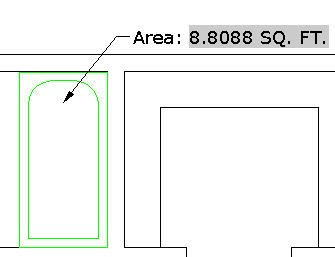
- If necessary, adjust the width of the text by dragging on the edge of the Multiline Text Editor’s ruler.
- Click outside the editor to close it. Here you see the result.
The post Tutorial-How to display the area of an enclosed figure appeared first on AutoCAD Tips Blog.